
|
Welcome to Gary's Imaginarium, From Dreams to Reality. |
This transcript is from "Blue Diode Laser - Shadow Boxes - Mirror Versus Acrylic"

|
|
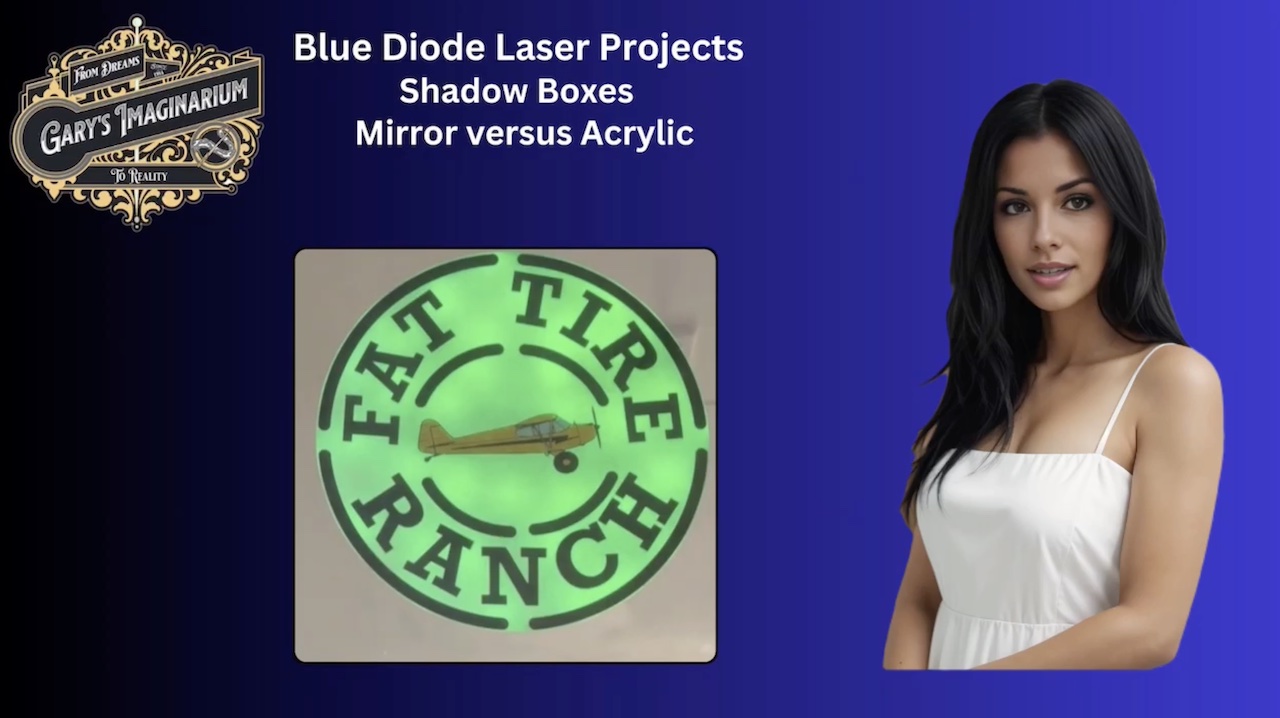
Are you looking to save both time and money on your next custom Shadow Box project? In a previous project, we created a "Fat Tire Ranch" backlit shadow box by etching the silver from the back of a mirror. First, we had to etch the areas to be painted black, which took our Blue Diode laser 8.5 hours. After applying the black paint, we had to realign the workpiece in the laser machine to etch the white and colored areas, which took an additional 12.5 hours. A 21-hour laser run for just etching is quite impractical, as numerous issues could arise during such an extended period. Additionally, etching the silver from the back of the mirror is both dirty and stinky. Using an enclosure and a fan is highly recommended. If you’re creating custom etched mirror Shadow Boxes, you might want to explore our method of using clear acrylic as an alternative. This approach is more profitable, as it speeds up the process and simplifies construction, making it both faster and easier to build. In this video, we’ll guide you through the entire process of building a backlit shadow box, from start to finish. We'll cover everything from preparing the Lightburn image to laser etching, weeding, painting, LED strip placement, and final assembly. So stick around; I will introduce our channel, then we'll get started. |
|
|
|
Hello, I am Gary's personal assistant Paula, and I would like to welcome you to Gary's Imaginarium channel. Where we will take you "From Dreams to Reality" using 3D printers, CNC machines, laser engraving, and lots of cool electronics projects. So let this adventure begin. |
|
|
|
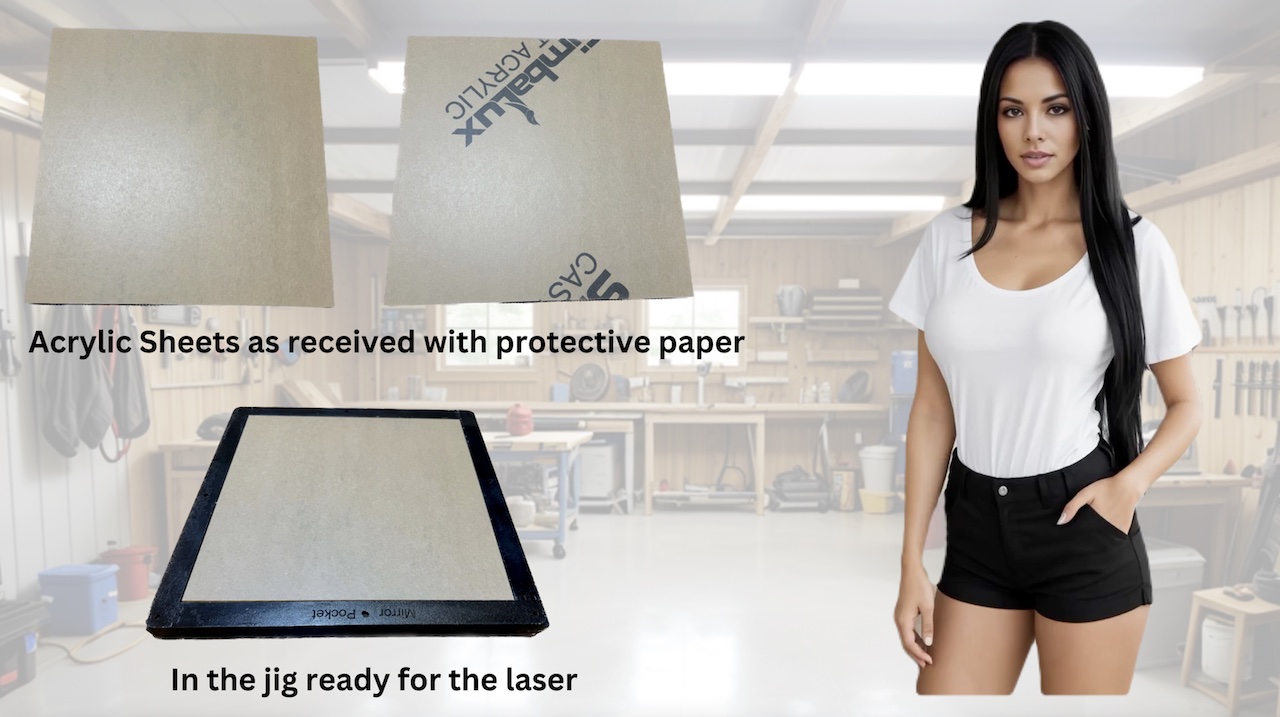
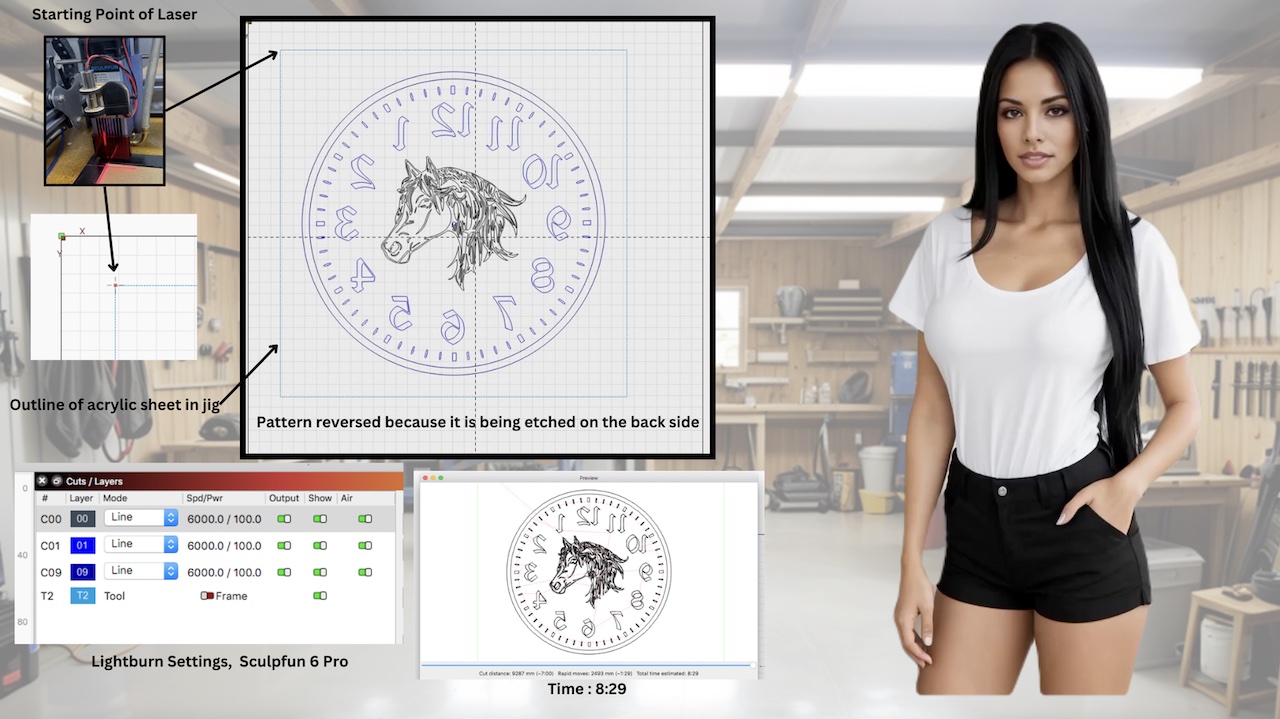
A while ago, we thought there must be a better way to build a cool shadow box than etching out the back of a mirror, so we decided to use clear cast acrylic and transfer paper. With transfer paper, all we would have to do is apply the paper onto the acrylic tile, etch out the lines of the image, then weed out the areas and color them. Just cutting out a stencil should be a lot faster. When we received our 12-inch square acrylic tiles, we realized that they came with a protective paper already attached. This paper is designed to come off without leaving any residue, so paint should stick just fine. Also, this saves us from using expensive transfer paper. So we'll leave both sides with the protective paper intact while we etch out the stencil. This should work out fine since a blue diode laser doesn't do anything to clear acrylic; it goes right through. The first 2 pictures show how it was received, and the third shows it in the jig we made to fit a 12-inch square tile on the laser bed. Below is a link to purchase the 12 by 12 cast acrylic tiles. |
|
|
|
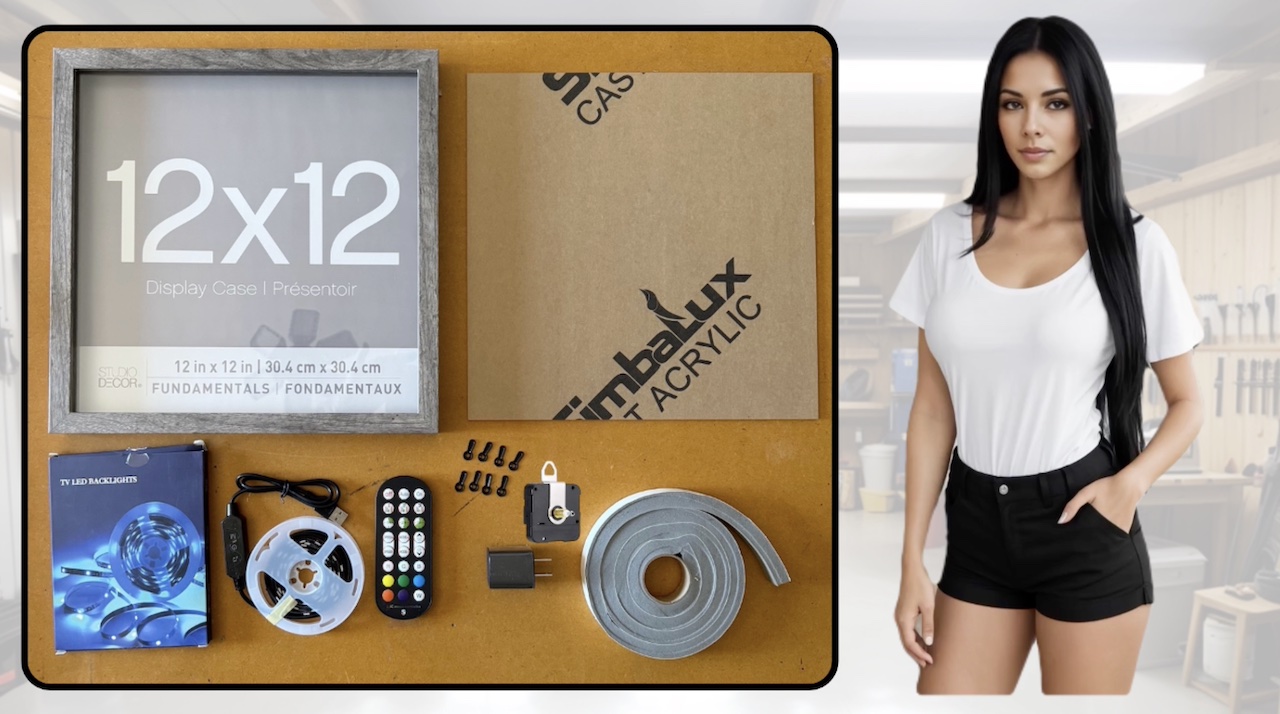
| We’ve received an order from a local rancher to build a shadow box clock featuring a horse-themed design. I have laid out all the parts needed for this project. Links to purchase these items are in the description below. Starting at the top left:
|
|
|
|
| This is the clock face the client chose for the shadow box. This Lightburn file is available for download in the description below. The Lightburn settings are for our SculpFun 6 Pro laser. We have moved the laser to the starting point, which is the top left corner of the jig, signified by the little red square. The 12 inch by 12 inch T2 tool outline is the actual outline of the acrylic sheet in the laser. Make sure you reverse the image because we are painting the acrylic sheet on the back side. We have air assist turned on with 6000 millimeters per minute at 100 percent power. The total time for the laser to cut out the stencil is 8 minutes and 29 seconds. That's a lot faster than 21 hours to totally etch out the silver on a mirror and a lot less messy. |
|
|
|
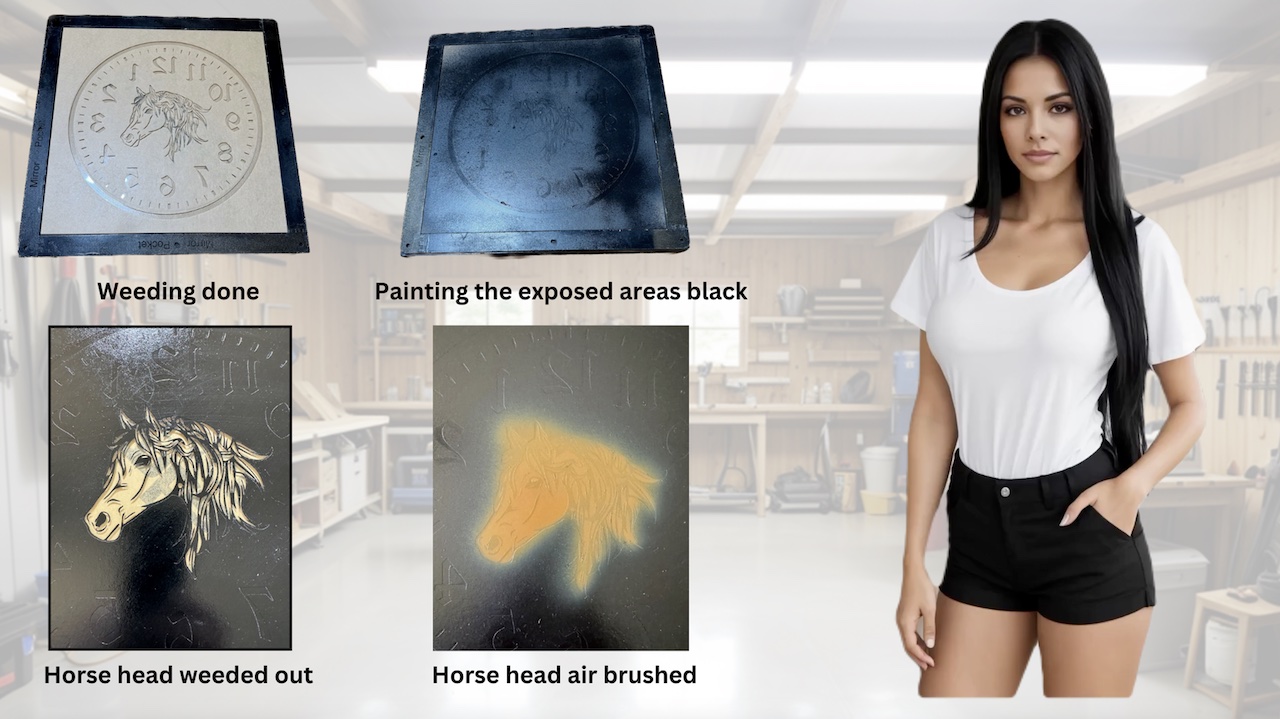
| Because the horse image was very detailed, it took us about an hour to finish weeding, as shown in the first picture. Weeding is a term used to describe the removal of unwanted parts of the stencil. The second picture shows that we painted the exposed areas with black Rustoleum paint. The horse image should be edged in black, but at this point, you can choose whatever color you would like for the clock face. When working on paint-over-paint projects like the one we're doing, and using products like Rustoleum, make sure to let each layer cure for at least 24 hours. Otherwise, the next layer of paint may bleed into the one underneath. The next picture shows the horse head weeded out. It took about half an hour and is now ready for airbrushing with acrylic paint. The last picture shows the horse airbrushed a light brown. We have about 9 minutes on the laser, 1.5 hours for the weeding, and about 10 minutes for painting. So far, we have spent approximately 1 hour and 50 minutes total. |
|
|
|
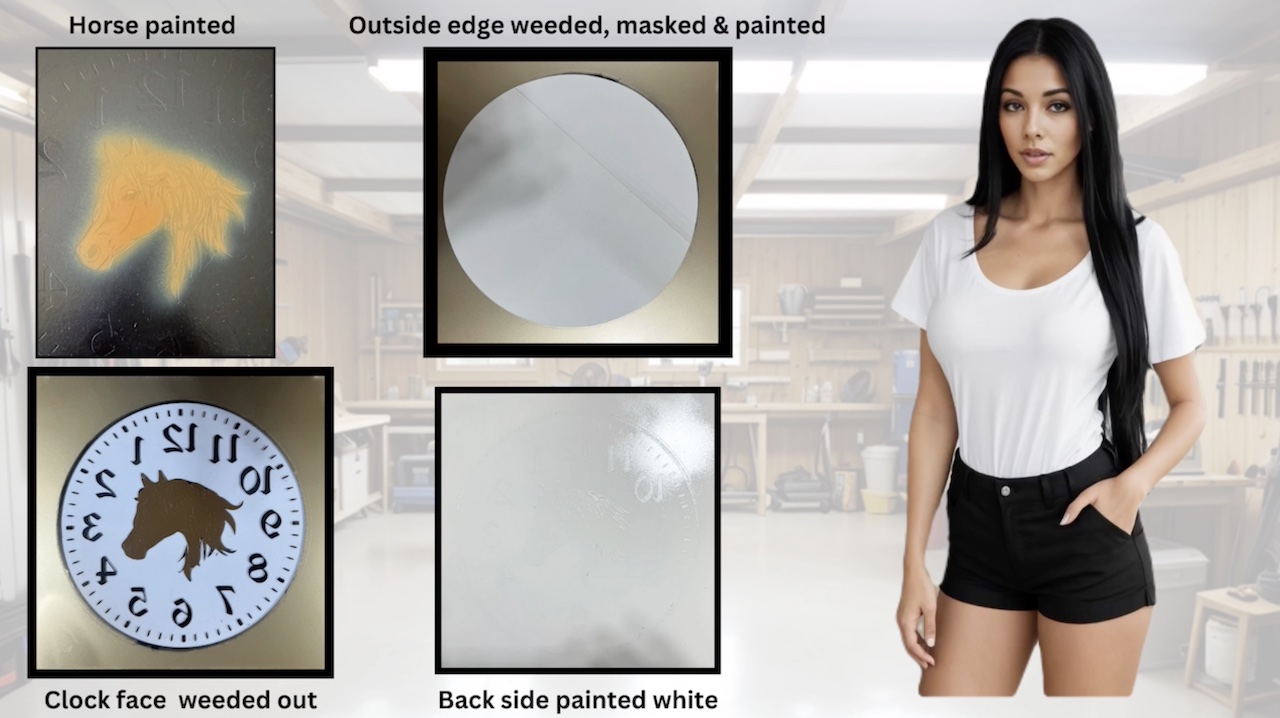
| The top left picture shows the horse painted brown. Since we're using an acrylic sheet and the stencil method instead of a mirror, we have more flexibility with our color schemes. For this project, we opted for a gold color for around the outside edge. We weeded out the outside edge, but in order to paint the outside edge, we will need to mask off the clock face. Remember, after the clock face is weeded out, it will receive a final coat of white paint to make it slightly translucent, allowing the LED colored lights to shine through. The top right picture shows the mask in place and the edges painted with gold Rustoleum. Next, we weeded out the clock face, as shown in the bottom left picture. I had to remove the cover paper from the back in order to see how the weeding was progressing. I have it sitting on some white paper so you can see how it looks before painting the whole back side white. The bottom right picture shows the completed clock face painted white and ready for mounting the clockworks. This weeding and painting procedure took about 2 hours, so we are about 4 hours into the project so far. Below is the link to download the Lightburn file for laser cutting the 10 and one-quarter inch mask. |
|
|
|
|
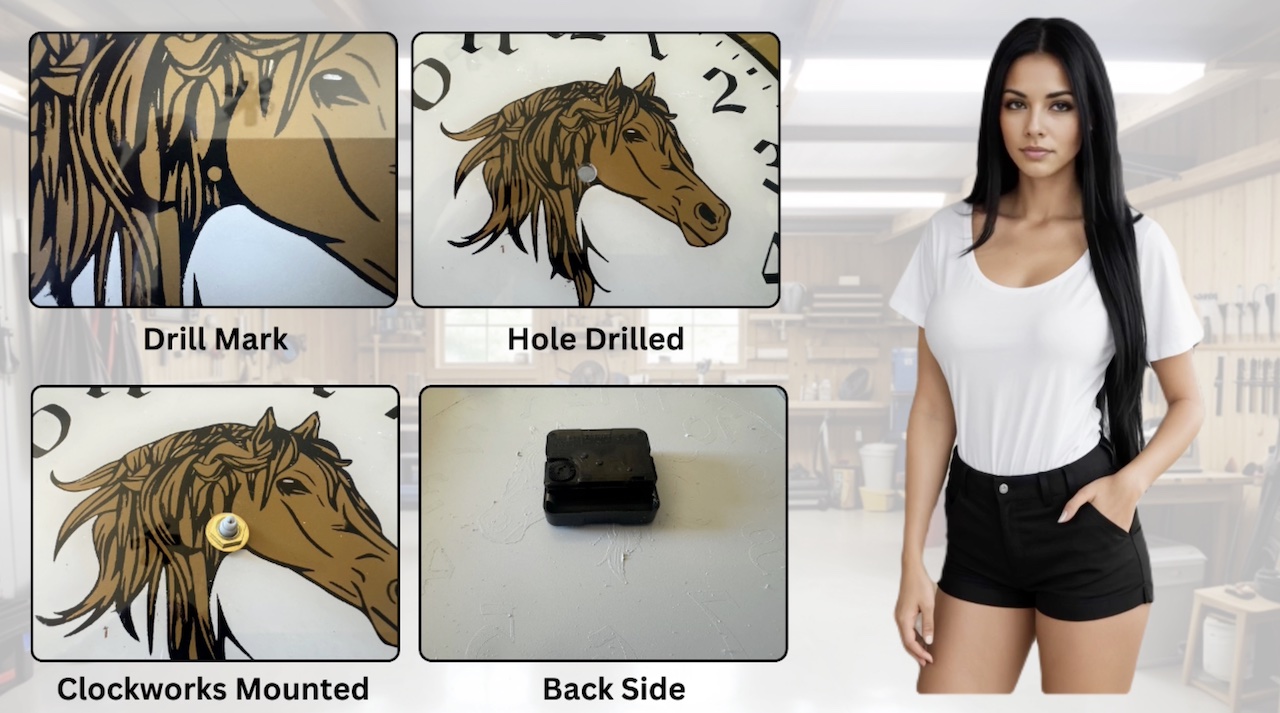
Now that the clock face is completely painted, it is ready to mount the clockworks. At the top left, from the Lightburn file, you'll see a small circle marking the center of the clock within the horse image. This is the location where the hole is drilled for the clock mechanism. Top right shows that we drilled a 5/16 inch hole to match the clockworks shaft diameter. Bottom left, we picked a clockworks with a short shaft length and mounted it into the clock face. Be sure to place the rubber washer between the clock mechanism and the clock face. This will secure it more firmly and prevent it from turning. At the bottom right is the backside view showing the clockworks right side up, with the battery compartment at the bottom. The clock mechanism comes with mounting hardware for hanging the clock by its works, but we didn't use it since the clock is enclosed within the Shadow Box. Instead, the Shadow Box features a built-in wall hanger on the back plate. Drilling and mounting took about 15 minutes. |
|
|
|
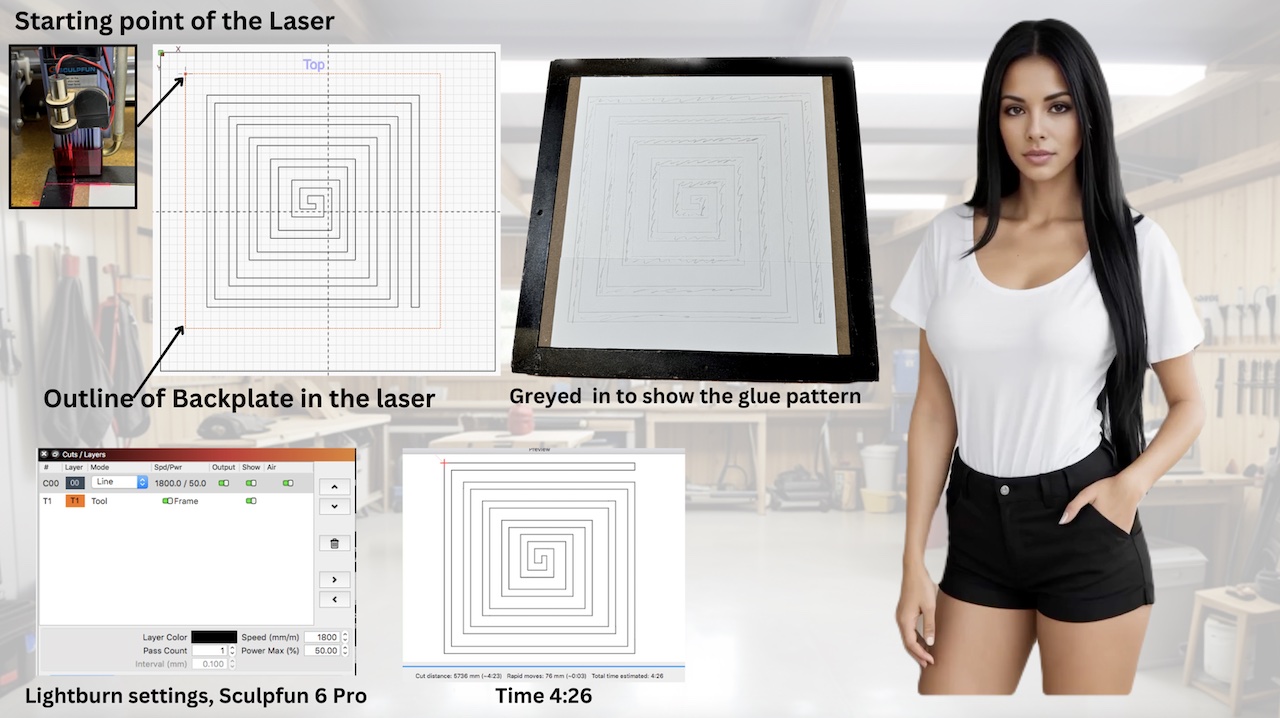
| We are going to mount the LED strip inside the back cover, but it does not have a white background to reflect the light back to the clock face. To enhance light reflection, we chose to paste an 8.5 inch by 11 inch sheet of white cover stock to the inside back cover instead of painting it. In order to glue the LED strip to the back cover, we will need a pattern or guide for its placement. We created a pattern in Lightburn so we could laser etch the guide onto the surface of the white paper. You can download the Lightburn file in the description below. The laser is set to 1800 millimeters per minute and 50 percent power. It looks like it will take about 4 minutes and 26 seconds to complete. After the laser did its magic, I greyed it out in pencil so we can see where to glue the LED strip. |
|
|
|
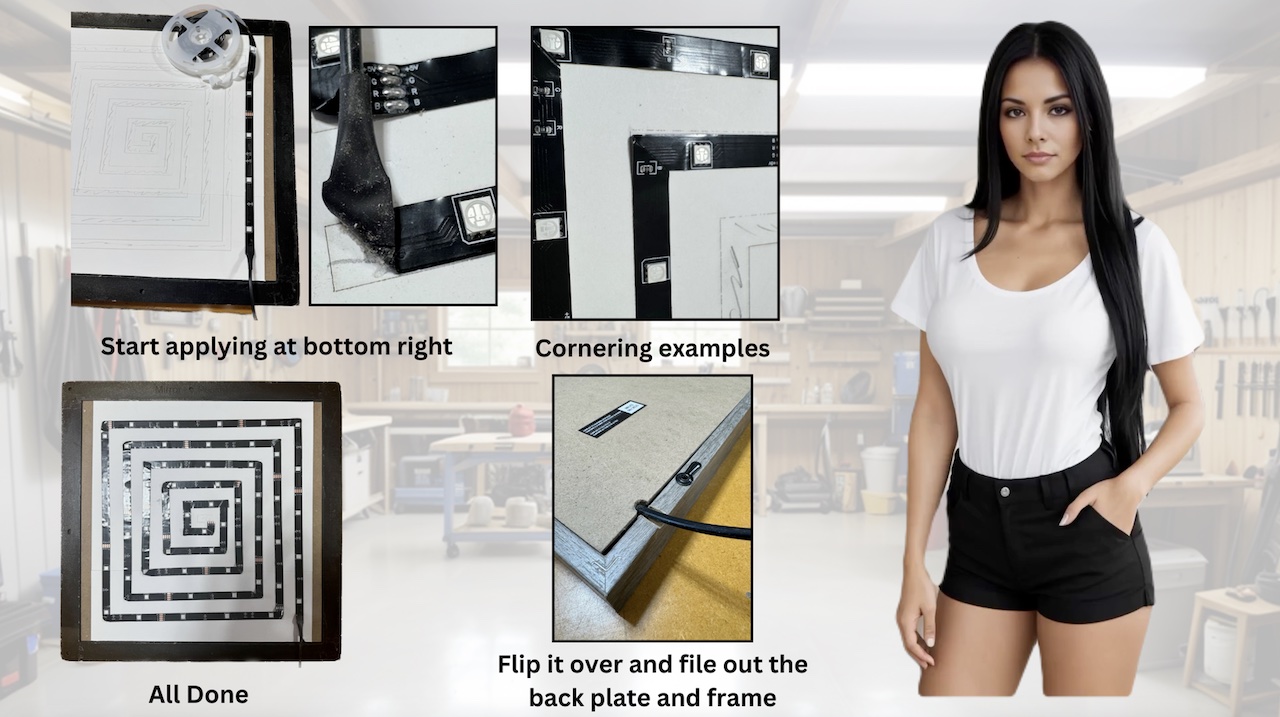
| As shown in the top left picture, we start to glue the LED strip at the lower right side. Start gluing the actual LED strip at the beginning of the pattern, as the inset shows. This should leave enough wire to be able to exit straight out the back or down the frame for wall mounting. Like the next two pictures show, when you come to a corner, leave a little excess, then move it around the corner, glue it down, and press down on the corner to create a fold. It will take a little practice. Don't worry about breaking the flexible printed circuit; it's pretty tough. Once you are done, power it up to make sure it works. Then flip it over, place it in the Shadow Box frame, and file out the grooves as shown for the wire to exit the box. These grooves will allow the Shadow Box to be set on a table or mounted on a wall. Laser engraving the backplate and mounting the LED strip took about 1.75 hours. So we are about 6 hours into the project so far. |
|
|
|
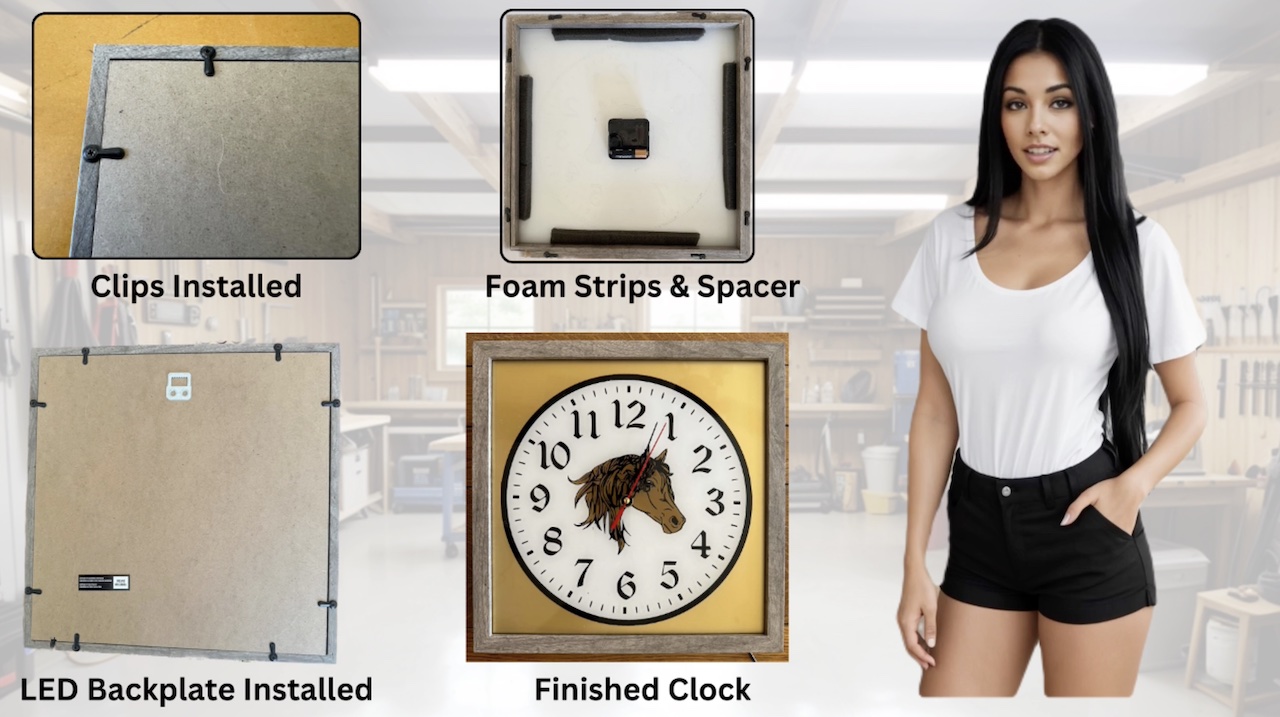
As shown on the top left, for the final assembly we started by mounting these little clips 2 inches in from each corner. These will make it easy to remove the back cover to replace the clock battery. At the top right, we laid the clock face down into the shadow box frame and glued 4 foam strips along the edge. This will cushion the spacer against the clock face. On the bottom left, we laid the LED backplate onto the cushioned spacer, pushed it into the shadow box, and rotated the clips to hold it in place. On the bottom right, the clock is now complete. The final assembly took about 30 minutes. So that completes our clock project. |
|
|
|
We've shown that you can build a beautiful shadow box clock in about 6.5 hours utilizing a sheet of acrylic, instead of the 21 hours needed just to etch out a mirror. Etching a mirror was even more dicey because, in order to build a clock, we would have to drill a hole in the glass for the clockworks. Not an easy task, and if you screw up, you'll break the mirror, and we all know that's 7 years of bad luck. We demonstrated how to use the protective cover that comes with the acrylic sheet to quickly etch out a stencil using Lightburn and a Blue Diode laser. This saves the job of pasting transfer paper onto the acrylic sheet, which is sometimes difficult to attach properly, and it saves you money. Then, it’s just a matter of weeding out the stencil and painting the various areas with your choice of colors. Then we showed you how to attach the LED strip to the inside back cover of the Shadow Box by first gluing it over with white cardstock to reflect the light and then laser engraving a gluing pattern. We demonstrated how to bend the LED strip around the corners on the square spiral pattern, which allows for a more even distribution of light. Then it's a simple matter of installing the clockworks and assembling it all into the Shadow Box, and voila—a beautiful Shadow Box clock you can enjoy for many years. After using this method a few times, you’ll likely be able to reduce the time significantly and increase your profitability in selling custom Shadow Boxes. I think you will agree the rancher who ordered this clock will be pleased. |
|
|
|
|
This is Paula, and you’ve been watching a production of Gary’s Imaginarium, a channel devoted to turning dreams into reality. Now for my quote of the day: "Even though everything seems real, in the matrix you are!" As always, thanks for watching! If you enjoyed this video presentation, please like and subscribe. |